SCP探索单细胞宇宙的魔法工具,加速生物信息学研究
在之前,小果为大家介绍了popsicleR这个令人惊叹的R包,它提供了从单细胞分析质控到细胞注释的整套流程。这种类型的R包被称为single-cell pipeline,为我们提供了俯瞰整个单细胞分析流程的便捷途径,让我们能够站在R包的肩膀上,轻松应对单细胞数据的挑战。
而今天,小果要向大家介绍一款更进阶的R包——SCP(single-cell pipeline),它不仅提供了高级的单细胞分析功能,例如拟时序分析、速率分析等,还拥有各种美观大气的数据可视化图。这款R包是由南京医科大学生殖医学博士亲自编写,可见其专业性与实用性。
SCP R包是一套强大的单细胞数据处理和分析工具,提供了全面的解决方案。其功能之强大,涵盖了众多生物信息学常用工具和函数,旨在简化单细胞数据分析的复杂性,使研究者能够更专注于科学探索,而无需花费过多时间在繁琐的数据处理上。
对于初学者而言,学习这样一个功能强大,汇集了大量函数的R包,最初的难点往往在于如何成功安装。因此,接下来小果将为大家展示如何在服务器和本地电脑两个不同的终端上顺利下载SCP,让大家轻松迈入单细胞数据的精彩世界。
温馨提醒:R 版本 >= 4.1.0哦
Linux终端
在服务器中进行安装,首先我们得新建一个conda的虚拟环境
# 创建新的虚拟环境conda create -n SCP_env r=4.1.3# 进入创建的新环境中conda activate SCP_env# 随后进行conda官网对所需要的R包进行下载## https://anaconda.org/anaconda/condaconda install -c conda-forge r-devtools # 我们先需要安装devtools,下载在GitHub上的SCP包# 也可以选择在R环境中进行下载,小果比较偏向于conda安装哦~ 这个选择并没有对错之分,哪种方法更适合你,下载速度更快,使用便是啦!以结果为导向!!if (!require("devtools", quietly = TRUE)) {install.packages("devtools")}options(timeout = 999) # 在使用devtools::install_github()函数时,都要设置好这个参数哦,它可以帮助我们顺利的从GitHub上下载R包devtools::install_github("zhanghao-njmu/SCP")# 在安装SCP的过程中可能会出现某一包无法安装的情况,我们可以使用conda进行安装,安装方法与安装devtools一致,在这小果就不赘述啦。
Windows终端
env_dir <- "D:/SCP_env/"dir.create(env_dir,recursive = TRUE)setwd(env_dir)# 使用小果曾经教过大家的renv包,在本地创建一个新的环境if(!require("renv")) install.packages(renv)renv::init(project = env_dir)
在成功创建环境后,我们可以看到这样的输出

在进入环境中,我们便可以开始安装R包,和Linux终端一样,我们首先需要下载的是devtools和BiocManager两个R包,对后续的R包进行安装操作。
if (!require("devtools", quietly = TRUE)) {install.packages("devtools")}options(timeout = 999)devtools::install_github("zhanghao-njmu/SCP")
在安装的过程中,我们可能会遇到这种情况

小伙伴们,遇到报错我们不要害怕哦,这个报错只是因为我们的依赖没有安装成功呢!我们只需要把报错上的手动的安装好就可以继续运行啦
if (!require("BiocManager", quietly = TRUE)) {install.packages("BiocManager")}BiocManager::install("R_names")# 如果碰上网络不稳定也可以进bioconductor官网(https://www.bioconductor.org/)下载安装包后进行本地下载哦install.packages(".tar.gz_dir", repos = NULL, type = "source")# 安装好R语言环境下的R包后,我们便可以载入SCP包,准备配置python环境下的包啦,这是因为单细胞分析的过程中,如:速率分析等是需要python环境的,因此我们在本地中也需要下载conda,配置基础的python环境。options(reticulate.conda_binary = "D:/conda/envs/SCP_env")# 在这一步我们需要指定好conda的环境,切记切记!路径最后不要加“/”哦,不然会出现报错# 在Windows的安装过程中,我们还需要额外在conda中安装一个包conda install jaxlib-0.1.70-cp38-none-win_amd64.whl# 可以从这个网址中下载适合自己电脑的安装包哦 https://whls.blob.core.windows.net/unstable/index.html# 安装python包我们使用一下命令SCP::PrepareEnv()# 但这步是有可能报错的,部分包因为版本不对应的或是无法正常加载的,我们都可以根据报错单独的进行下载,使用以下的命令(这边小果使用了pip的临时清华源进行下载哦)pip install -i https://pypi.tuna.tsinghua.edu.cn/simple packages_names
无论是Linux还是Windows,当能成功运行以下代码的时候就证明我们基本已经成功啦!为什么说是基本呢?小果在这先卖个关子哦
library(SCP)data("pancreas_sub")
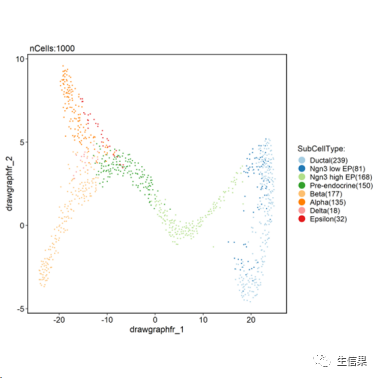
pancreas_sub <- RunPAGA(srt = pancreas_sub, group_by = "SubCellType", linear_reduction = "PCA", nonlinear_reduction = "UMAP")## 'misc' slot is not converted.## 'tools' slot is not converted.CellDimPlot(pancreas_sub, group.by = "SubCellType", reduction = "draw_graph_fr")
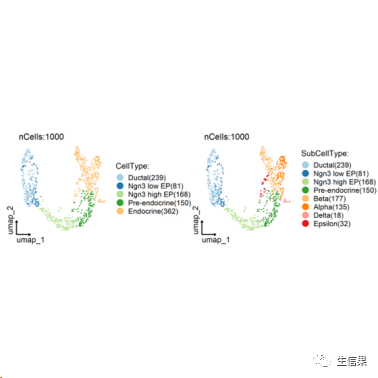
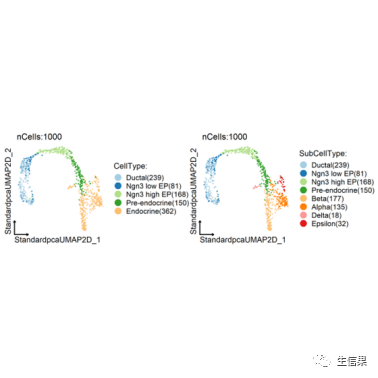
##细胞聚类CellDimPlot(srt = pancreas_sub, group.by = c("CellType", "SubCellType"),reduction = "UMAP", theme_use = "theme_blank")
##细胞周期注释CellDimPlot(srt = pancreas_sub, group.by = "SubCellType", stat.by = "Phase",reduction = "UMAP", theme_use = "theme_blank")

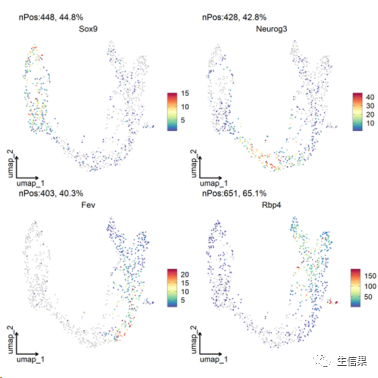
##特征注释FeatureDimPlot(srt = pancreas_sub, features = c("Sox9", "Neurog3", "Fev", "Rbp4"),reduction = "UMAP", theme_use = "theme_blank")
FeatureDimPlot(srt = pancreas_sub, features = c("Ins1", "Gcg", "Sst", "Ghrl"),compare_features = TRUE, label = TRUE, label_insitu = TRUE,reduction = "UMAP", theme_use = "theme_blank")

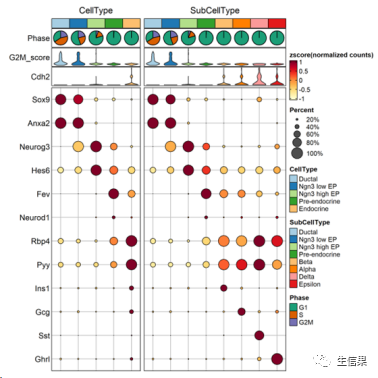
##细胞类型、百分比和细胞周期ht <- GroupHeatmap(srt = pancreas_sub,features = c("Sox9", "Anxa2", # Ductal"Neurog3", "Hes6", # EPs"Fev", "Neurod1", # Pre-endocrine"Rbp4", "Pyy", # Endocrine"Ins1", "Gcg", "Sst", "Ghrl" # Beta, Alpha, Delta, Epsilon),group.by = c("CellType", "SubCellType"),heatmap_palette = "YlOrRd",cell_annotation = c("Phase", "G2M_score", "Cdh2"),cell_annotation_palette = c("Dark2", "Paired", "Paired"),show_row_names = TRUE, row_names_side = "left",add_dot = TRUE, add_reticle = TRUE)print(ht$plot)
##质控## conda install -c bioconda bioconductor-scdblfinder 依赖不适配# 安装路径pancreas_sub <- RunCellQC(srt = pancreas_sub)CellDimPlot(srt = pancreas_sub, group.by = "CellQC", reduction = "UMAP")

CellStatPlot(srt = pancreas_sub, stat.by = "CellQC", group.by = "CellType", label = TRUE)
CellStatPlot(srt = pancreas_sub,stat.by = c("db_qc", "outlier_qc", "umi_qc", "gene_qc","mito_qc", "ribo_qc", "ribo_mito_ratio_qc", "species_qc"),plot_type = "upset", stat_level = "Fail")

##标准流程pancreas_sub <- Standard_SCP(srt = pancreas_sub)CellDimPlot(srt = pancreas_sub, group.by = c("CellType", "SubCellType"),reduction = "StandardUMAP2D", theme_use = "theme_blank")
往期推荐

如果小伙伴有其他数据分析需求,可以扫码了解Rstudio账号,或者点击原文进行了解~
点击“阅读原文”立刻拥有
↓↓↓